Len Pratt, president of Pratt Homes, has recently penned an article for and featured in Fine Homebuilding.
A Strong Case for Wood Foundations
You may be skeptical of a foundation made of wood, but it’s fast and easy to build and more energy-efficient than concrete.
Permanent wood foundations (PWFs) are not a new concept. In 1985 the American Wood Council (AWC) presented the idea to Minneapolis home builders and building inspectors. After the demonstration, Minnesota’s chief building inspector declared he would build his house on a wood foundation, and he worked with a wood-component manufacturer in Prescott, Wis., to make and set the foundation walls for his house.
Not long after our chief inspector built his house on a wood foundation, I did too, and so did my foundation contractor, Scott Johnson of SA Johnson Construction. Since then, Scott has installed over 500 PWFs and my company has built more than 1000 homes on PWFs. We are not alone. Since 1937 when the AWC developed its PWF construction standard, more than half a million wood foundations have been put into service in the United States.
PWFs are built from pressure-treated wood-framed walls with pressure-treated plywood sheathing. They’re a viable alternative to concrete-block and cast-concrete foundation walls, and there are provisions in section R402.1 of the International Residential Code (IRC) for using them. PWFs can be employed anywhere in the country for full-height basements or crawlspaces and for large and small additions.
PWFs also eliminate a lot of concrete and its associated carbon inputs. We set my home’s foundation panels on concrete footings because Scott and I think it’s far easier to level the footing formwork than the individual panels that make up the foundation. But you can further reduce the amount of concrete in a house’s construction by building a PWF without a concrete footing, using a wider piece of pressure-treated lumber for the foundation walls to bear on.
If you live in an area where concrete or block foundations are the norm, a foundation made from studs and plywood might sound like a bad idea, but I think a wood foundation is a viable alternative to block or concrete and has a number of advantages over those foundation types.
Bring the panels on-site
Machine help required

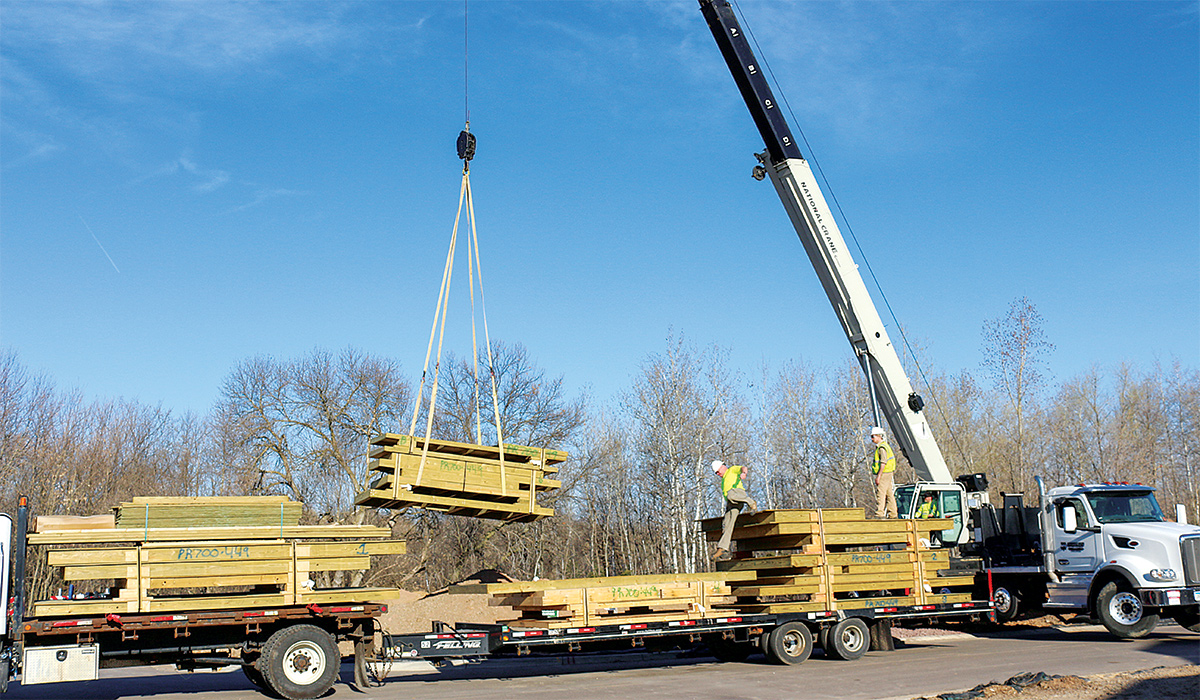
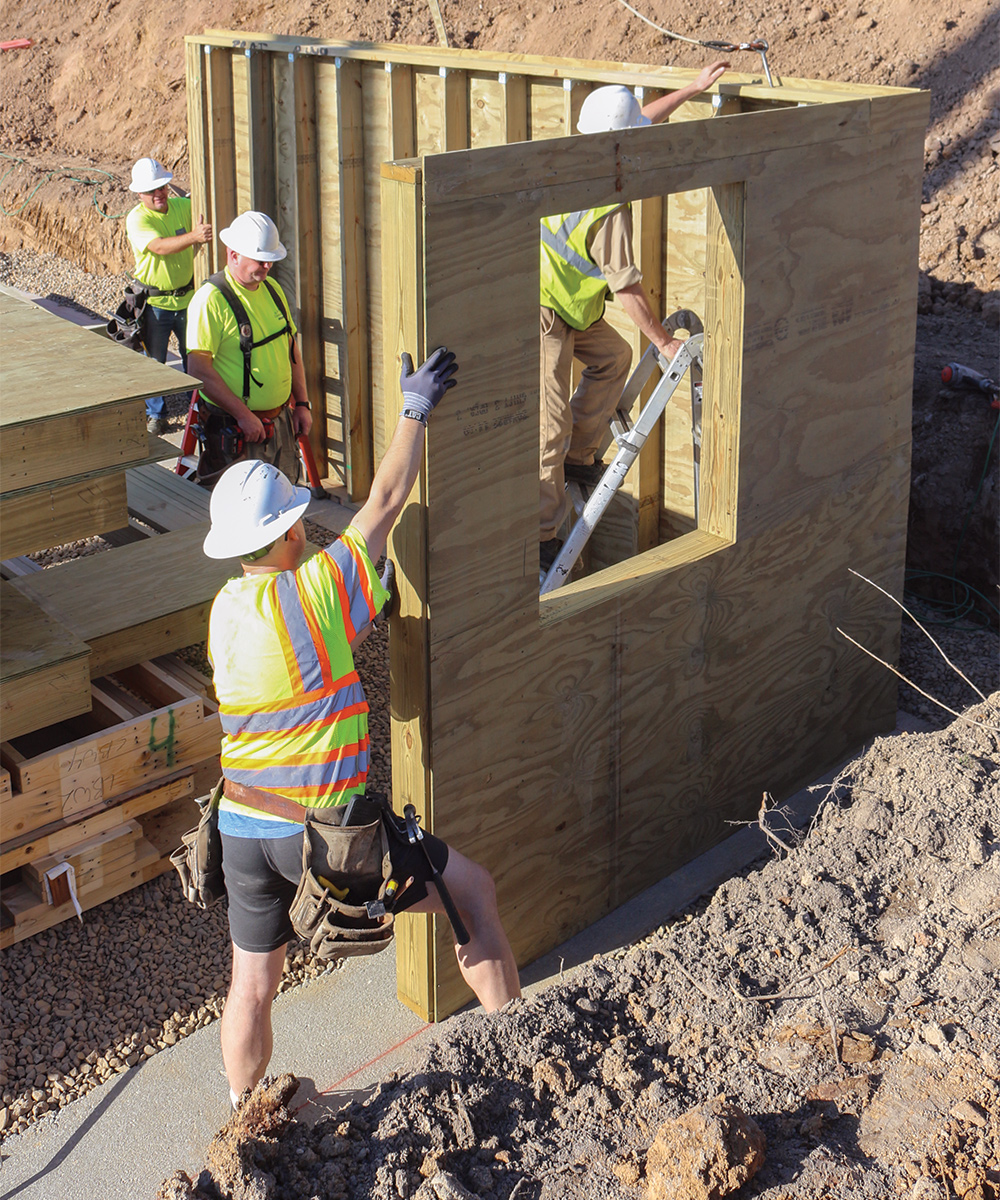
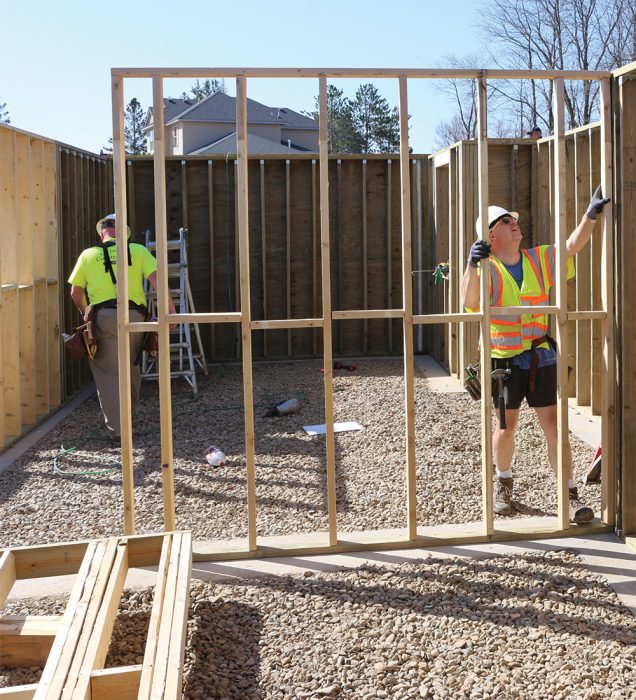
The 8-ft.-tall foundation wall panels are made up of 2×8 studs spaced 12 in. on center and sheathed with 3/4-in. treated plywood. The panels are delivered on a flat-bed trailer from the component manufacturer and are arranged in the order required to construct the basement. The panels are lifted off the truck and placed on the concrete footing with a crane.
Details keep the foundation dry
All foundations need to keep water out of the basement or crawlspace. Concrete foundations are often covered with dampproofing or waterproof membranes, and sometimes a dimple mat to relieve hydrostatic pressure. But concrete can get and stay wet with no problems. I think the greatest worry when builders consider a wood foundation is rot. Treated plywood isn’t very porous, though, and is manufactured for heavy-duty below-grade contact to protect against decay and insects. The sheathing joints are shiplapped and sealed to prevent leaks.
My houses have a 12-in.-deep gravel bed at the base of the foundation walls that’s tied into a gravity drain running to a sump pit with a pump. The drains remove standing water from the sides of the footings and relieve hydrostatic pressure against the walls. A layer of poly sheeting on the foundation walls provides a low-resistance path for water to flow down the walls into the gravel bed and drain tile. These details keep the foundation reliably dry and comfortable.
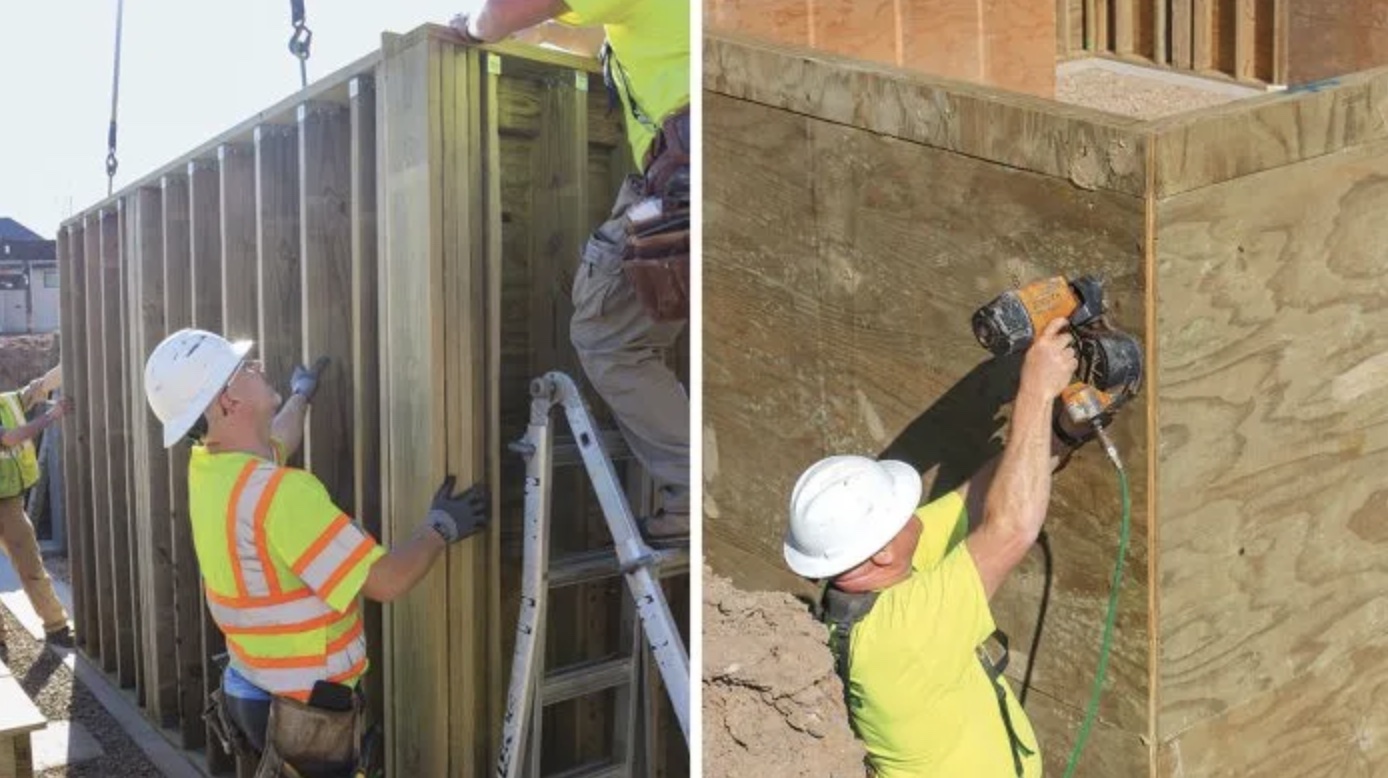
Lift, set, and seal the panels
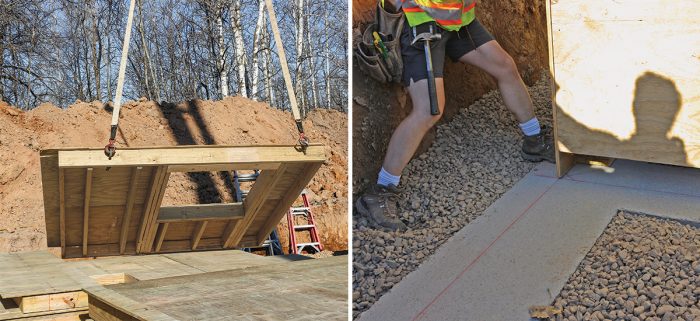
The locations of the foundation walls are laid out on the concrete footing with snapped lines before panel placement. The panels are lifted from eyebolts in holes drilled in the top plate by the component manufacturer. The assembly process starts at a corner so the first two panels can be self-bracing.
Seal seams
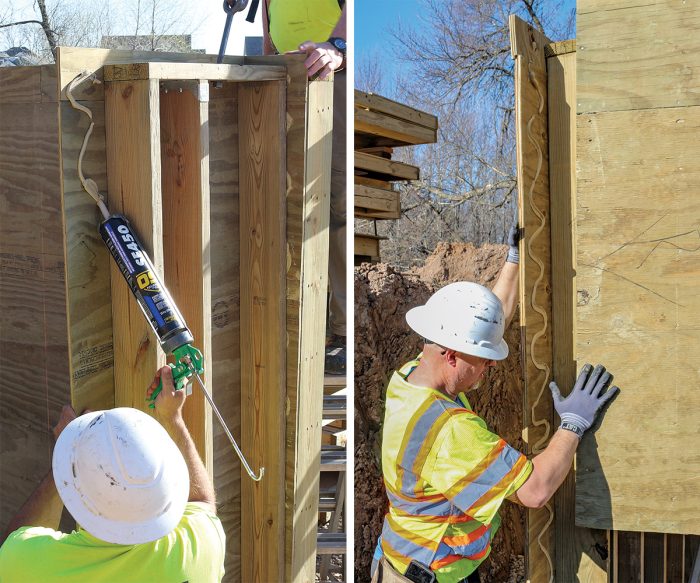
The foundation corners and the seams where individual panels meet are sealed with Tremco Vulkem 116 single-component polyurethane sealant. The sealant, which is made for below-grade applications, helps keep out water and adds strength to the assembly.
Check for plumb
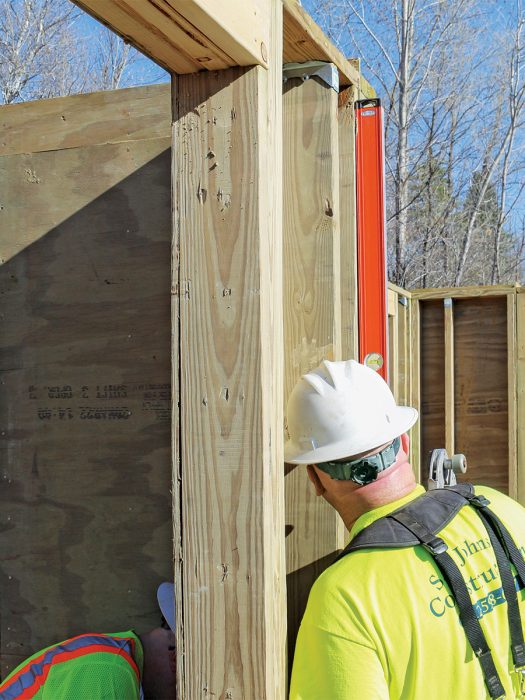
As the panels are set, we check them for plumb with a 6-ft. level. The thick panels tend to stay plumb on the troweled concrete footing, so bracing them plumb is seldom necessary.
Connect corners with screws

Six-inch-long washer-head structural screws driven at an angle through the top plate connect panels at inside and outside corners. The screws add strength and hold the corners tightly together while the adhesive sets.
Nail corners and seams
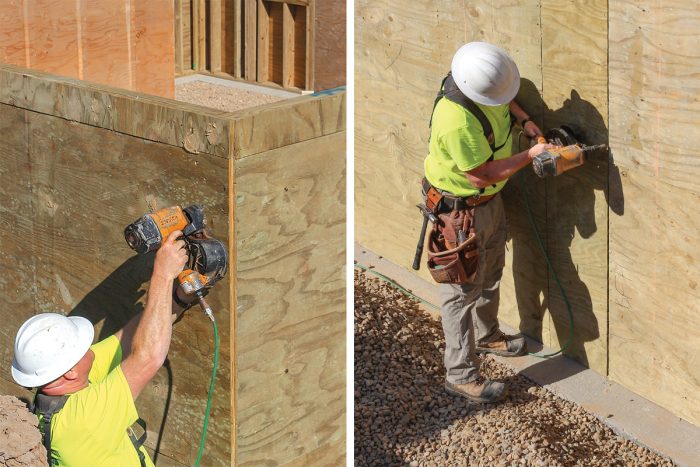
At corners and where field panels join, we nail through the sheathing into the wood studs with 3-1/4-in. by 0.131-in. stainless-steel, full-round-head nails. At corners, one of the panels includes an 8-in. sheathing overhang that is nailed to the adjacent panel on the other side of the corner.
Fast, easy builds
We use wall panels from Edgebuilder, a component manufacturer in the Upper Midwest, for our new-home builds. With no formwork to set and strip and no concrete to cure, we save three to four days on our foundation installation using these prefabricated wood panels. This also eliminates two days of finishing the basement for living space.
You can frame a PWF on-site using the same design specs the building component manufacturer uses. They are found in the American Wood Council’s Permanent Wood Foundation Design Specification, which is the design standard that is cited in the IRC. Building the foundation panels is a good option for builders trying to do as much of the work as possible or when the construction site is far from a component manufacturer. As you might expect, trucking costs go up with distance from the plant.
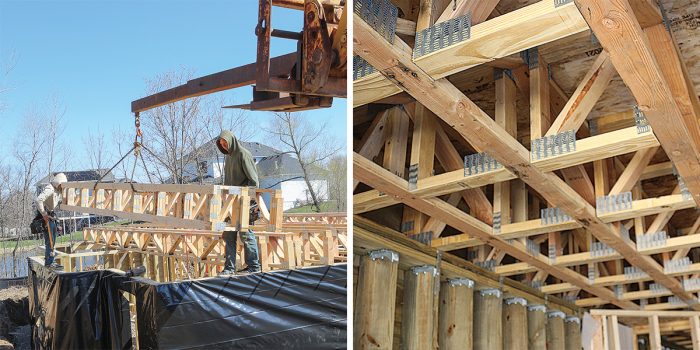
The project shown in the photos started at 8:30 a.m., when a crane arrived at the site and began setting up. The truck delivering the panels had shown up a little earlier. The crane first moved the banded panels, which were stacked on the trailer in the correct order for construction, to the foundation excavation. Once the truck was unloaded, the crew set the walls one at a time with the crane’s help. By 10 a.m., the crane was driving away with all the walls standing, and Scott’s crew was taking a break before covering the foundation walls with poly sheeting. By 3 p.m., the crew was pulling off the job, and the foundation for the house, including all interior basement walls, the garage, and the front porch, were done. The following day, the framing crew built the floor system that reinforces the wood foundation and acts as an essential structural element.
Strengthen the system with interior walls and floor trusses
Interior walls act as bracing
The component manufacturer also supplies 2×8 framed interior wall panels that help brace the foundation walls. These are installed similarly to the foundation. Without sheathing, however, they are far lighter.
Seal panel seams
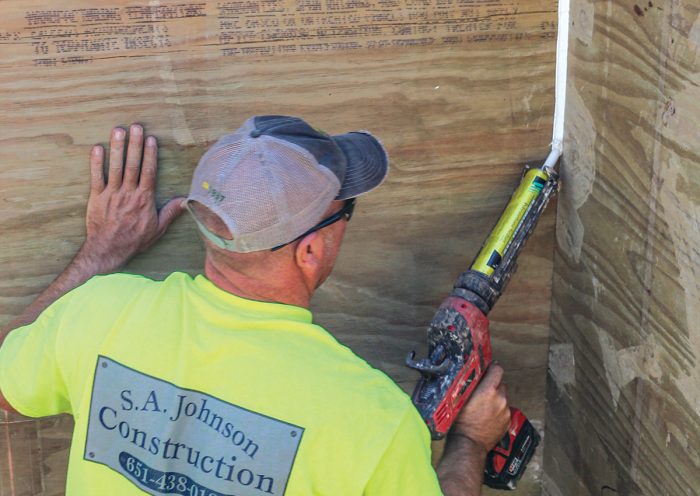
Once all the wall panels are placed, we cover the panel seams with a heavy bead of Vulkem 116, the same one-part polyurethane sealant we used for joining the foundation panel sections and corners. This is a second line of defense against water intrusion.
Poly, then second plate

A layer of 6-mil black poly sheeting provides a smooth surface for water to run down the foundation and enter the footing drains. The poly is temporarily held in place with staples until a second plate is nailed on top. The second plate permanently secures the poly and reinforces the top of the foundation.
Floor resists lateral loads
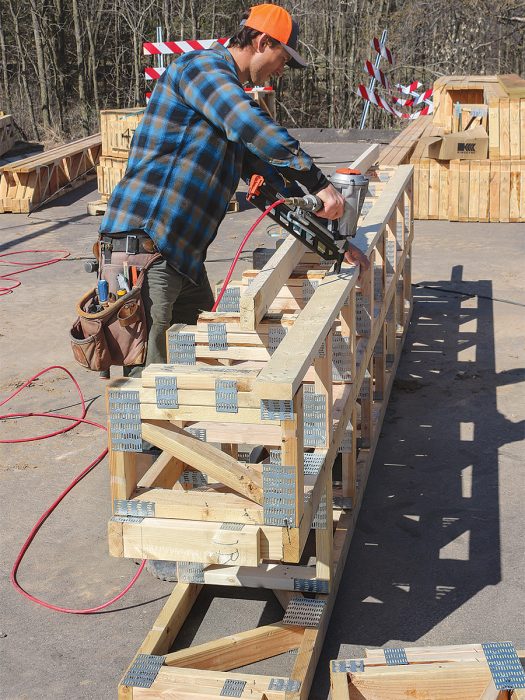
The floor system is engineered to help the wood foundation walls resist soil pressure. Foundation walls parallel to the floor trusses have blocking made at the component plant and nailed to the trusses on-site to spread the force exerted by soil pressure over more than one floor truss.
Tie the floor to the foundation

Metal straps nailed to the top of the foundation panels connect the floor system to the foundation walls. The straps are nailed to the trusses on the exterior and to the studs inside.
Tie the foundation to the footing
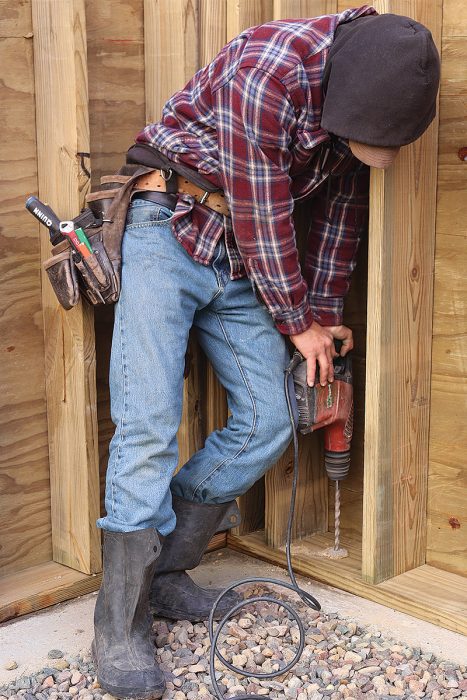
Simpson Titen HD 1/2-in.-dia. concrete screw anchors secure the foundation panels to the footing. A hole is drilled into the footing with a rotary hammer, and then the screw anchor is driven with an impact wrench.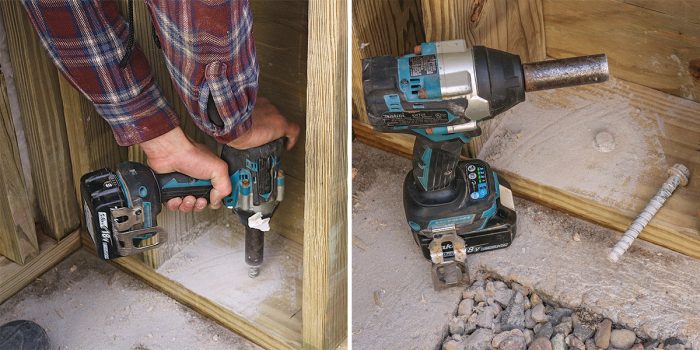
Considering costs
Comparing the costs of foundation types is difficult. I find that the faster build time and my proximity to a PWF panel supplier makes our typical 1800-sq.-ft. PWF about $5000 less than a concrete foundation. If you live in an area with a lot of masons, a block foundation is likely to be less expensive. Similarly, if the project is far from a component manufacturer, block or cast concrete may be cheaper. The depth and complexity of the foundation also weighs into the equation. We find that PWFs are easier to finish than other foundation types, so if the build has basement living space like our homes do, those costs are lower too.
Len Pratt is the president of Pratt Homes in St. Paul, Minn. Photos by Andrew Zoellner.


